Today, I am excited to share with you how to make a Flip Top Fancy Fold card. This card requires a full sheet of 8 1/2″ x 11″ card stock. Below, you will see an illustration of the score lines and areas that need to be trimmed away. Please don’t think this is a difficult card. It, absolutely, is not. Just watch the video and follow the illustration below…super easy!
I chose to use Stampin’ Up’s Inked & Tiled Stamp set for my images and some sentiments from the Timeless Arrangements Stamp set. Most of the work is done by Inked Botanicals 6″ x 6″ Designer Series paper. I used three different patterns throughout the card. The front greeting is die cut using the rectangles from Nested Essentials Dies making it easy to layer. I embellished the front with Glossy Dots Assortment.

Images copyright 1990-2023 Stampin’ Up!®
The video below will demonstrate how to score and cut your card base, as well as, assemble the card. Further down in the post, you will find picture with more hints for making this card, as well as, a second card. You will, also, find the supplies, measurements and instructions with a downloadable PDF. Leave me a comment, I would love to know your thoughts regarding this Flip Top Fancy Fold card.
Inside Layers of Flip top Fancy Fold
With the top flipped open, I attached the layer of the second design of Designer Series Paper to the card front. In the original card, this layer is left with just the Designer Series Paper. But, because I wanted to add another sentiment with a floral image, I added a second layer of Very Vanilla. In my second card below, you will see I did not add the Very Vanilla.

Images copyright 1990-2023 Stampin’ Up!®
On the inside of the card, I attached my second piece of the first Designer Series Paper to the underside of the flap. Next, I attached the third design of Designer Series Paper on the left of the inside . On my layer of Very Vanilla, I used the largest floral image from Inked & Tiled. Since I wanted the images to be multi-colored, I used my Stampin’ Write Markers to color the images. Remember, if you do this, it is best to “huff” on the stamp right before stamping. The warm of the breath, moistens the stamps so that your image stamps well. I then attached this layer to the right of the inside.

Images copyright 1990-2023 Stampin’ Up!®
Cutting & Scoring Instructions for Flip Top Fancy Fold Card base:
- Card stock: 8 1/2″ x 11″
- Score at 4 1⁄4” turn card stock and score again at 5 1⁄2”
- Cut on 5 1⁄2” score line (crossing the 4 1⁄4” score line) to 4 3⁄4”
- Turn and flip card stock and cut at 4 3⁄4” to 5 1⁄2”, remove this portion
- Cut 1⁄2” off to 5 1⁄2” score line on right side.
- Cut 1⁄2” off flap end
Flip Top Fancy Fold Illustration
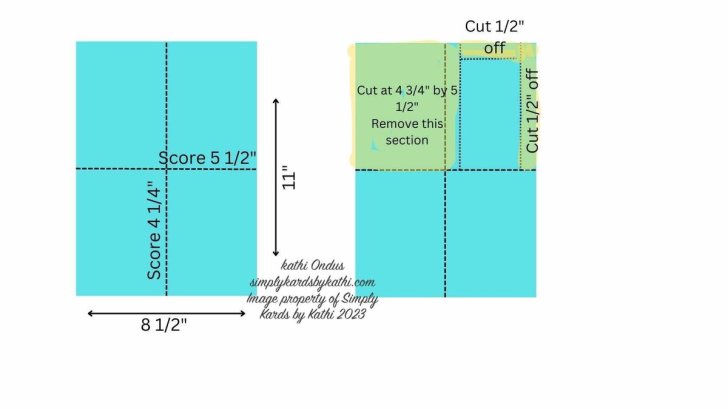
Image property of Simply Kards By Kathi
Measurements: Flip Top Fancy Fold
- Pool Party
- 8 1/2″ x 11″ scored at 4 1/4″ and turn and score at 5 1/2″ (card base)
- 2 “x 2 1/4” (die cut)
- Very Vanilla
- 4″ x 5 1/4″ (inside right layer)
- 3″ x 4 1/4″ (top layer/stamping)
- 2″ x 2″ (die cut)
- Inked Botanicals Designer Series Paper (3 different patterns)
- 3″ x 4 3/4″ (cut 2) (front and back flap layers)
- 4 x 5 1/4″ (front layer)
- 3/8″ x 5 1/4″ (inside left layer)
Additional Flip Top Fun fold:

Images copyright 1990-2023 Stampin’ Up!®

Images copyright 1990-2023 Stampin’ Up!®

Images copyright 1990-2023 Stampin’ Up!®
Supply List:
Stay Up To Date
If you are looking for some inspiration and ideas for crafting, 2-3 free downloadable tutorials per week and staying up-to-date on Stampin’ Up! products and news, sign up to receive my weekly newsletter. You can find the sign up form either in the right hand column of each post, the bottom of each page, or on my “Home” Page.
Do you want to be notified when I publish a new post? If so, subscribe to my blog for updates on new posts. You can find this at the bottom of the “Home” Page.
Earn a free stamp set/supplies when you purchase from me using my current Host Code which can be found in the right hand column of the page. Keep up-to-date on Stampin’ Up! Promotions and Specials. Click the buttons below to learn more.


